Simple List View Example in Android
In this program I will insert the data into
the array list and delete the contains from the array list. Here I am inserting
the data temporarily. This data will not store in the database. Let’s see the
program coding:
In main.xml I taken two buttons, one is for
insert and another is for delete and taken list view.
main.xml
will look like this:

main.xml
<?xml version="1.0" encoding="utf-8"?>
<LinearLayout xmlns:android="http://schemas.android.com/apk/res/android"
android:layout_width="fill_parent"
android:layout_height="fill_parent"
android:orientation="vertical"
>
<TextView
android:layout_width="fill_parent"
android:layout_height="wrap_content"
android:gravity="center"
android:text="Enter
Text" />
<EditText
android:id="@+id/et_main"
android:layout_width="match_parent"
android:layout_height="wrap_content"
android:inputType="textPersonName"
>
<requestFocus />
</EditText>
<RelativeLayout
android:id="@+id/relativeLayout1"
android:layout_width="match_parent"
android:layout_height="wrap_content"
>
</RelativeLayout>
<RelativeLayout
android:id="@+id/relativeLayout2"
android:layout_width="match_parent"
android:layout_height="wrap_content"
>
<Button
android:id="@+id/btn_add"
android:layout_width="wrap_content"
android:layout_height="wrap_content"
android:layout_alignParentLeft="true"
android:layout_alignParentTop="true"
android:text="Add"
/>
<Button
android:id="@+id/btn_delete"
android:layout_width="wrap_content"
android:layout_height="wrap_content"
android:layout_alignParentRight="true"
android:layout_alignParentTop="true"
android:text="Delete"
/>
</RelativeLayout>
<RelativeLayout
android:id="@+id/relativeLayout3"
android:layout_width="match_parent"
android:layout_height="wrap_content"
>
</RelativeLayout>
<LinearLayout
android:id="@+id/linearLayout1"
android:layout_width="match_parent"
android:layout_height="wrap_content"
android:orientation="horizontal"
>
<ListView
android:id="@+id/lv_main"
android:layout_width="wrap_content"
android:layout_height="fill_parent"
android:layout_gravity="center"
>
</ListView>
</LinearLayout>
</LinearLayout>
ListViewActivity.java
import java.util.ArrayList;
import java.util.Collections;
import
android.app.Activity;
import android.os.Bundle;
import android.view.View;
import
android.view.View.OnClickListener;
import
android.widget.ArrayAdapter;
import
android.widget.Button;
import
android.widget.EditText;
import
android.widget.ListView;
import
android.widget.Toast;
public class ListViewActivity extends Activity {
/** Called when
the activity is first created. */
@Override
public void
onCreate(Bundle savedInstanceState) {
super.onCreate(savedInstanceState);
setContentView(R.layout.main);
final Button add_btn = (Button)findViewById(R.id.btn_add);
final Button del_btn = (Button)findViewById(R.id.btn_delete);
final ListView myListView = (ListView)findViewById(R.id.lv_main);
final EditText et_main = (EditText)findViewById(R.id.et_main);
final ArrayList<String> al = new ArrayList<String>();
final ArrayAdapter<String> ad;
ad = new ArrayAdapter<String>(this, android.R.layout.simple_list_item_1,al);
myListView.setAdapter(ad);
add_btn.setOnClickListener(new OnClickListener()
{
public void onClick(View v)
{
String str =
et_main.getText().toString();
Integer cout = myListView.getCount()+ 1;
String str1 = cout.toString().concat("."+str);
al.add(myListView.getCount(), str1);
//Collections.sort(al);
ad.notifyDataSetChanged();
Toast.makeText(getApplicationContext(),
"Data Saved", Toast.LENGTH_SHORT).show();
et_main.setText("
");
}
});
del_btn.setOnClickListener(new OnClickListener()
{
public void onClick(View v)
{
al.remove(al.size()-1);
ad.notifyDataSetChanged();
}
});
}
}
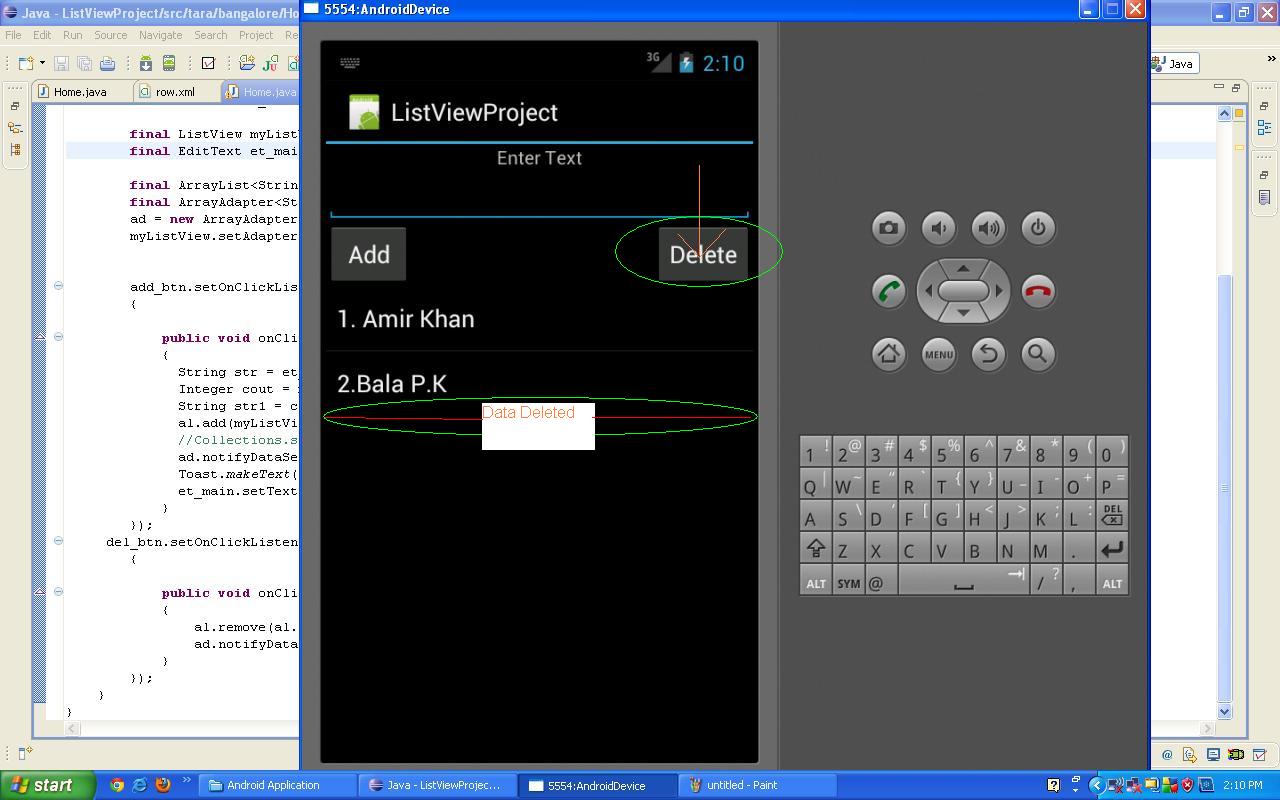
Result:
When you will click on Insert Button, the
data insertion will be successfully. If you want to remove the data , just
click on the delete button. It will remove from the last.
See here I am inserting the data , Putting
Value(Name) : “Divya Bharati”. When you will click on the Add Button, it will
insert into the list.

Check bellow, “Divya
Bharati” added into the list.

See again bellow picture , after clicking on the delete button, “Divya Bharati” deleted as it was
entered last.
What if i want to delete a specific entry in the list?
ReplyDeleteCode not working...........
ReplyDelete